So, I just got a new corporate laptop and I’m setting it up to make it feels like $HOME. Thought it’d be cool to write down the steps in case I need to do it again later. This blog will serve as a reference for future setups.
-
Brew
The first step is definitely to install homebrew.
$ /bin/bash -c "$(curl -fsSL https://raw.githubusercontent.com/Homebrew/install/HEAD/install.sh)"
- iterm2
$ brew install --cask iterm2
- zsh
$ brew install zsh
- oh-my-zsh
$ sh -c "$(curl -fsSL https://raw.githubusercontent.com/robbyrussell/oh-my-zsh/master/tools/install.sh)"
- tmux
$ brew install tmux
-
Vimplug
🌺 Minimalist Vim Plugin Manager: Vimplug. Please check out the repo to see how to add and install vim plugins.
$ curl -fLo ~/.vim/autoload/plug.vim --create-dirs \
    https://raw.githubusercontent.com/junegunn/vim-plug/master/plug.vim
-
Overwrite default vim and tmux config file with my configuration:
One can check out my dotfile repo at here.
$ wget https://raw.githubusercontent.com/LxYuan0420/dotfiles/main/.vimrc
$ wget https://raw.githubusercontent.com/LxYuan0420/dotfiles/main/.tmux.conf

$ mv .vimrc ~/.vimrc
$ mv .tmux.conf ~/.tmux.conf

$ vim ~/.vimrc
# use command `:PlugInstall` to install vim plugins
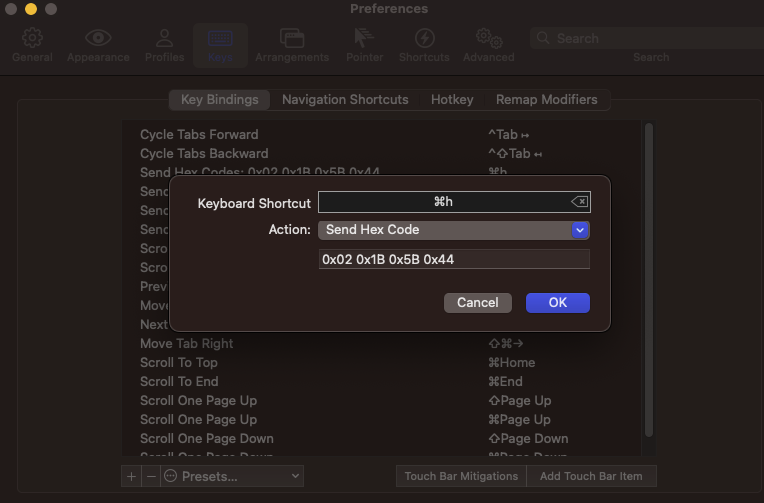
Personally, I like to move around between tmux panes with alt-hjkl (or cmd+hjkl), similar to the vim binding. However, if you are using mac os, you need do some extra steps to make that happen.
- Hover to top left
- Select key > key bindings > +
- Select
Send Hex Codeat action - Enter the following hotkeys and hex sequence one by one:
# for Mac iterm2 Cmd-hjkl move tmux pane
# iterm2 > Preference > keys > +
#Mac hotkey      Hex sequence            Purpose
#Cmd-h           0x02 0x1B 0x5B 0x44     Move to pane at left
#Cmd-j           0x02 0x1B 0x5B 0x42     Move to pane below
#Cmd-k           0x02 0x1B 0x5B 0x41     Move to pane above
#Cmd-l           0x02 0x1B 0x5B 0x43     Move to pane at right
Image for reference: